Colours of the skin
Beginners usually don’t realise how many colours there are in a person’s skin. A common mistake is to choose a basic flesh colour, then add white and black to create highlights and shadows respectively.
Using this approach for a white person like me, you might end up with a palette that looks a bit like this:
This is basically a single colour gradient. Its lack of hue variation means the subject’s flesh will look dead, and the portrait boring.
Real skin is much more interesting. It can include blues, pinks, violets, yellows, greens and more. This holds less true for black people than for white people who have relatively translucent skin, but it is true of everybody to some degree. Look carefully at your own skin and you’ll see what I mean. This is before we consider colour reflected onto the skin from the environment, such as from brightly-coloured clothing, or from the light itself, such as the orange glow cast by a setting sun. So when you paint a portrait, by all means start with a base flesh colour, but remember to look for other, sometimes unexpected colours created by veins, hair, variations in skin tone etc. Three very simple suggestions might be:
- A bit of blue under the eyes.
- A touch of red on the cheeks, nose and ears.
- A hint of green or purple in the shadows.
If we want, we can exaggerate these hue variations to make our picture more lively.
Below is a portrait of a young woman by Lucien Freud. I have picked out a few of the colours he used for the face (leaving out the eyes and hair).
This painting is in the realist tradition – a more radical or abstract artist like Picasso can enjoy using colour more riotously. Yet note how Freud has used yellows, reds and even greenish and bluish hues besides the brownish hues one might expect. These colours help create a really vivid, and indeed more realistic, portrait.
That said, the actual colours are less vivid than you might think. Here is a detail from Rubens’ portrait of his daughter, Clara Serena:
Rubens is a master of the ruddy complexion, and this strikes us as a very ruddy child indeed. But if we take a closer look at that vivid left cheek – see inset – we see that the colours are more muted than you’d think. The small second box is a colour sample from the cheek and it is certainly not bright red, more a dull terracotta. Assuming you are seeking realism, it is best to resist the temptation to use strong colours and to instead carefully build up the painting using muted hues. The vividness of Clara’s cheeks comes from the relative contrast of this muted terracotta with the even more muted colours around it.
Colour zones of the face
In light-skinned people, the face can be divided into three broad colour zones: white/yellow, red and blue-grey.
In the forehead there are relatively few surface capillaries, or blood vessels, making it a little more white or yellowish in appearance. It also tends to be slightly better lit, because it’s at the top. In the middle region of the face there are lots of capillaries full of red blood cells, giving the ears, nose and cheeks a reddish tint. And in the lower third, the chin and upper lip have a greyish or bluish tinge thanks to the hair follicles, and because it can be fractionally less well lit. This normally more affects men, but for women and children artists sometimes like to add green as a complimentary colour to bring out the lips.
Again this feature is more visible on white people than on darker people.
The three zones can be very subtle, but once you know to look for them you will spot them regularly. For example here is a pair of portraits by Rembrandt Peale:
Left: Portrait of Henry Robinson. Right: Portrait of Rosalba Peale.
You won’t find the zones in every painting, and your portrait isn’t wrong if you leave them out, but you should be aware they exist.
Creating a palette
Online you can find pre-prepared palettes – basically a set of swatches – for painting skin tones. For example here is a set made by Lauren K. Cannon for a DeviantArt tutorial series. You can save your own favourite colour combinations in Photoshop as swatch sets so they are ready to use again and you don’t have to repeat your work.
Premade swatches can help get you started, but you can easily end up using the same set of colours for every head you paint, and it is misleading to think you can create a standard recipe for any object, given the multiple variables that influence colour. It is more rewarding to mix your own skin tones for each portrait.
You can create skin tones using a limited starting palette of the yellow, magenta and cyan primaries plus black and white.
Begin by finding a basic skin tone. Use the yellow and magenta to create an orange. As we noted above, skin has muted colours – if a colour looks too bright you can make it more neutral by mixing in a little of its complementary colour, so add a bit of cyan to your orange to mute it. Mix in dabs of white and (very sparingly) black to get the base skin tone you’re looking for. Now create lighter and darker variations. Here’s a palette I created:
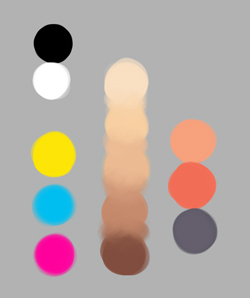
On the left are the five starting colours. The next column shows the range of five tones I mixed, with the middle one serving as the base skin tone. The third column shows three extra colours for warmth and shadows. This would be fine to kick off. While painting we could add more mixes as we went along.
When mixing the range of colours you need, ask yourself what is the hue or local colour of the subject’s skin? Nobody is literally ‘white’ or ‘black’. Is it more reddish, more yellowish? What is its value – is it lighter or darker? How saturated or intense is it – people who are florid from years of booze and outdoor work will be more vividly coloured than an invalid who’s lain in a dim room for years. You don’t have to get all these colours exactly right before you start, of course. You can keep adjusting as you go along.
Try to think beyond clichéd assumptions. For example if you are painting a white European you may instinctively assume you need to paint them a light brown. In fact they may not appear light brown at all, since the local colour of a person’s flesh is affected by the light falling upon it. If they are standing with their back to a sunset they may be in very dark shadow with a bright orange glow. If they are lying on a bright yellow pillow, part of their face may be bathed yellow with the reflected light. If they are in a dark room they will be poorly lit and thus appear dark themselves.
An intense light source can blast out local colour altogether. A strong light source creates strong highlights and shadows; a gentle, diffuse light source creates gentle highlights and shadows.
Create swatches using the Mosaic filter
When you’re thinking about what colours to use there is a sneaky technique you could try. Find a painting whose colour scheme you like. Open it in Photoshop and use Filter > Pixellate > Mosaic to reduce the image to basic blocks of colour. You can choose the degree of pixellation. Here is an example using the Rubens image:
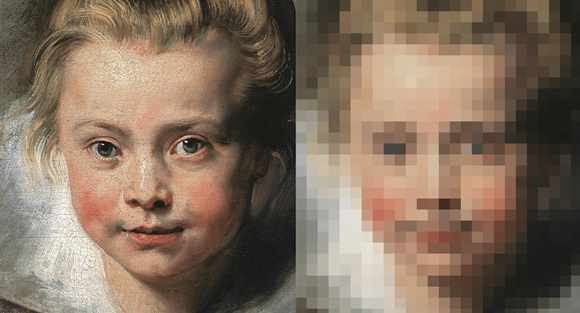
This simple process creates a kind of swatch palette you can use as inspiration for your own paintings.
Warm and cool in portraits
In the previous article we discussed warm and cool colours. We can apply the same principles to a head in a portrait. Pairing cool light with warm shadow, or vice versa as Lucien Freud did in his painting above, creates a nice contrast and livens up the picture. Traditionally, professional portraits tend to be painted in north-lit studios, as north light is less harsh than the direct sunlight that comes from the south, and this has led to a preference for cool light with warm shadow. Rembrandt’s method was to layer cool highlights, warm light, cool half-tones and warm shadows.

In practice, this broadly means that in a cool light you will have orange-ish shadows, and in a warm light you will have blue/purple shadows. Now, if you have a warm light source it doesn’t mean your shadows must be blue or purple, just that they should be a cooler version of the light. You have to consider the local colour of the object, i.e. the person’s head, and the temperature of the light source, and so on.
A couple of tips:
- Colour changes on a portrait often take place where there is a change of light or plane, so consider alternating warm and cool at these places.
- Changes of colour temperature from one stroke to another make things more interesting. Juxtaposing strong patches of warm and cool will help to make a particular bit of the painting grab the viewer’s attention.
- Warm colours tend to jump forward a little more, so perhaps use them on nearer portions of the face and use cooler colours on portions that are farther away. Keep these shifts subtle.
- Where skin touches skin or folds upon itself, it becomes warmer in colour.
It’s up to you how intense you make your contrasts. Remember that by mixing colours with their complements we can create less brilliant, more neutral hues.
This interplay between light and warm is not just a technical trick – it makes a more believeable painting, and, at the risk of generalising, a more enjoyable painting. So being able to identify the temperature of colours is an essential skill.
Practicing skin-painting
3D art has introduced the idea of the texture sphere as a standard way of presenting how to paint different materials and surfaces. The idea is to take a particular material and imagine how it would behave when painted as a sphere. Instead of simply copying what is in front of you each time, you have to understand the material well enough to make it work in three dimensions, and to repeat the process from imagination when you need it. Digital artists can use them to practice, amongst other things, human skin.
In my illustration below I show three stages in the creation of a texture sphere for skin. I’ve done studies for three complexions: fair, medium and dark.
1) Draw a circle with the elliptical marquee tool and fill it with your base skin tone, then lock the pixels of the circle. This means you can paint in the circular area only and needn’t worry about keeping the edges neat.
2) Paint in the half-tones and shadow, using a hard brush at a low opacity (say 20%). You can get a very smooth effect very quickly using a soft airbrush but skin doesn’t have a perfectly smooth texture. Remember the highlights and shadows will be less saturated than the mid-tones.
3) Finish off with highlights – not too shiny, as it’s skin – and reflected light. In my examples below I’ve used a slightly blueish light for a cool highlight, and a purplish tint for a warm shadow. Add some texture, using white dots to imply the texture of pores.
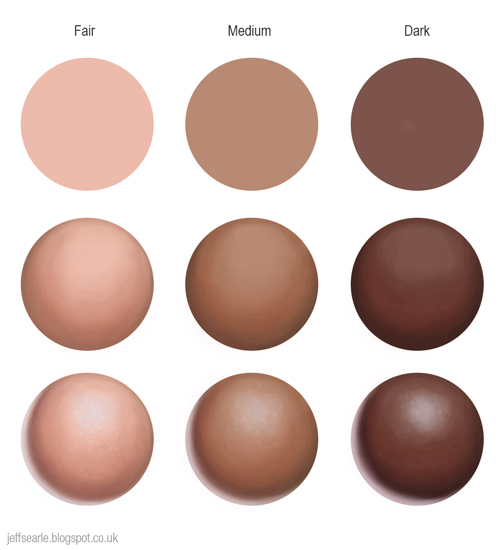
We can go further by practicing different light effects. In the examples below, I augment each complexion with veins, green light, and a cast shadow from an imaginary second object:
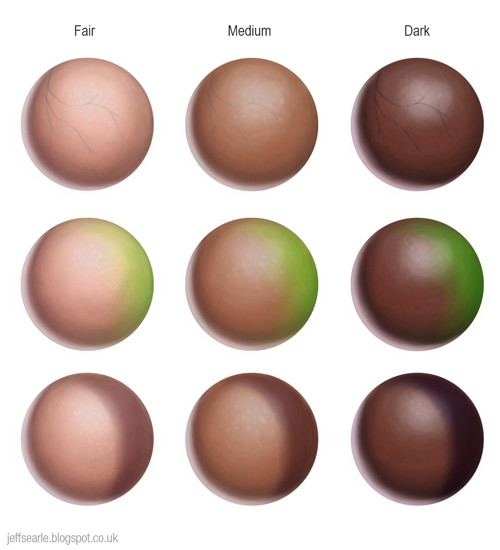
Texture spheres are a great way to practice. Make some of your own.
Subsurface scattering
Painting is all about light, and light behaves differently depending upon the material it’s striking. To paint materials realistically you need to know about these effects and be able to reproduce them. A human being is not solid, like a statue, but has a luminous outside layer.
 |
| Photo |
The effect occurs when you are looking at an object with a strong light behind it – if you’re in front of it with the light behind you, you will see it lit as normal – and is particularly noticeable on small objects like fingers, noses and the fleshy parts of the ears. In ears, fingers etc we see a bright and saturated red, an effect blocked by more solid substances such as the bones in the fingers. Even if your sitter is front-lit, you might observe a red tinted edge where light travels through the skin.
Here is a quick digital study I made of subsurface scattering affecting the ear:
And here is my attempt at a subsurface scattering texture sphere:
Note that black people’s skin absorbs more light thanks to its higher melanin content, so more of the light coming off it is reflected rather than scattered.
The classic oil painters built up their flesh in layers, and the paint, being translucent, would have a convincing fleshiness to it through several colours working at once. How can we reproduce this luminosity? As the light bounces through the shadow areas it makes them warmer and more saturated, particularly at the core shadow, so on a new layer try adding red-orange throughout the figure at the edge of the core shadow and adjust it using blending modes.
Edges
Edges mark the ends and beginnings of forms, changes of plane on the same form, or changes of colour or value. The selective defining of edges is one of the ways an artist can guide the viewer’s eye in a picture.
It is natural for a beginner to assume that all the edges in a realist drawing or painting should be sharp, because when we look at an object its edges appear in focus. However, edges that are on the periphery of our vision, or are moving, or are further away, are softer and can even be impossible to see at all. Careful variation of edges therefore is important to the illusion of realism and three-dimensionality, and also gives us some textural contrast. A painting with all hard edges will look rigid and full of cut-out shapes.
There is a scale of edges running from hardest to softest. Not everyone categorises them in exactly the same way, but essentially edges can be hard, soft or lost.
- Hard edges are clear, crisp strokes placed side by side. They create contrast and therefore attract attention. Use your hardest edges to help draw the viewer’s eye to centres of interest. Some artists additionally talk of firm edges which are a bit less defined.
- A soft edge is a slight blur between two forms. Objects only become sharp when we focus on them, so in general you should keep your edges soft. This is how the old masters painted. Soft edges let the eye roam unhindered.
- A lost edge occurs when you can’t tell where one thing ends and the other begins. Perhaps the two forms are very fuzzy, or have very similar tonal values. Typically you might find it where dark hair disappears into a dark background. Lost edges are a good way to loosen up a picture.
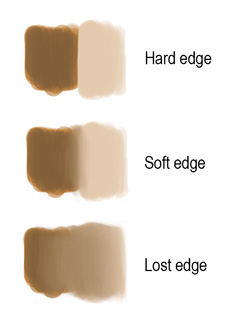
Here is an illustration of hard, soft and lost edges as used by Rembrandt:
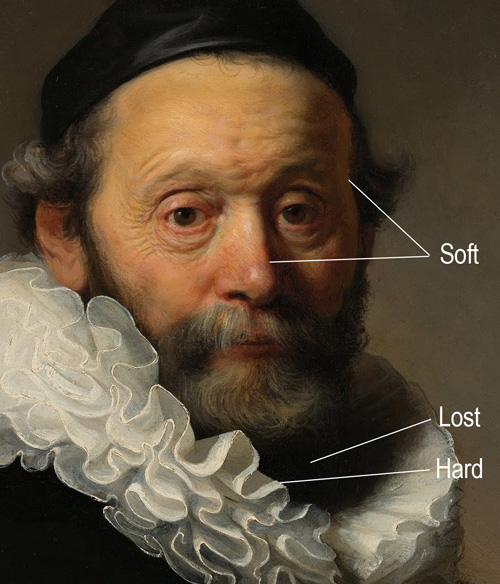
Rembrandt: Portrait of Johannes Wtenbogaert (detail)
Of course much depends upon the context of the picture. If a hard-edged object sits against another of very similar colour and value, the edge will no longer jump out and may even become effectively ‘lost’.
Use your edges in combination with other aspects of a picture, such as contrasts of hue and value, to lead the viewer’s eye around the painting. They will help you create a sense of space, atmosphere and realism. We may lay out a few rules of thumb:
- The brighter the light, the harder the edge; the dimmer the light, the softer the edge.
- The nearer the object, the harder the edge; the farther the object, the softer the edge.
- Harder on hard, smooth forms; softer on soft, textured ones.
- Harder on motionless forms; softer on moving ones.
- Harder on the centre of interest, soft elsewhere.
You don’t need to define every edge fully, because the viewer will understand the forms and supply missing information from their imagination. This is most obvious with lost edges, but generally, you can establish part of an edge then let the rest dissolve away if you wish, because the viewer’s mind will assume the rest.
I think the beauty of soft edges comes from this shortage of information. A hard, clear form feels done and dusted, whereas the ambivalence within a soft edge allows the imagination to enter the work... to let the viewer supply what isn’t quite said.
Distance
Near objects are hard-edged and far objects soft-edged, so you can manipulate edges to communicate their relative distance from the viewer. The broad movement of edges into a painting with any depth of field, such as a landscape, will normally be from hard to soft. This doesn’t mean that everything near must be hard-edged and everything distant must be soft-edged. You just need to be aware of the tendency and to manage the way objects advance and recede so that they work together to produce the effects you want.
The example below illustrates a few principles at once. See how John Singer Sargent modulates the edge of Mrs Boit’s seat.

John Singer Sargent: Mrs. Edward Darley Boit (detail)
From a hard edge with strong contrast at the start (A) it continues into a soft edge with low contrast at (B). It almost becomes a lost edge at that point. Keeping the line as well-lit and crisp as it is at (A) would interfere with our understanding that it disappears behind the seated figure. I expect Sargent also didn’t want anything distracting us from Mrs Boit’s head and neck. The crisp line created at (A) points towards her face, a directional cue that would be spoilt if our eye was led downward again further along that edge.
The main point to take away is that, as the painter Stapleton Kearns puts it, edges need to be designed, not observed. And if your artistic intuition suggests handling an edge in a certain way, it may be best to go with it, even if it breaks one of the ‘rules’.
Making it ‘painterly’
 | |
| Sargent’s brushstrokes cut a painterly dash in his portrait of Gabriel Fauré. |
This is less of a challenge for traditional media than for digital painting. I don't necessarily advocate trying to make digital art imitate traditional media – the curmudgeon in me thinks if you really want an ‘oil paints effect’, use oil paints. But the pixel-precise control and mechanical tools available in software can make paintings look artificial and plasticky.
I think a painterly texture contributes to a sense of animation. A lively person moves around and is a bit blurry, whereas to closely peruse the details of a person’s face they have to hold still. Someone painted to a ‘perfect’ level of polish and focus can easily look frozen, whatever their facial expression.
Here are a couple of ideas:
- Edges are very important. Let strokes of colour sit side by side with minimal blending and smoothing.
- Be prepared to leave parts of the painting very rough and loosely finished.
- Avoid mechanical effects like computer-generated gradients or airbrushes.
- Don’t overwork the painting.
- Start with big loose strokes, then zoom in and create detail in key areas with smaller loose strokes.
A couple of regular, versatile brushes are mostly all you need. Some artists prefer Corel Painter for its artsy brush tools, and custom brushes can make nice effects. There’s no harm in experimenting with your brush settings to make them more unpredictable or textured, and a customised Smudge tool (not the default smeary one) can give texture to your edges. Photoshop’s answer to reproducing paint effects is the Mixer Brush, which lets you blend colours on the brush with colours in the painting.
But painterly texture is not primarily about what brush you use, so much as how you use it, and your understanding of light, colour and atmosphere. Only experimentation and experience will get you where you want to go, and don’t be discouraged if it takes a long time, even years, to figure it out. Do lots of studies aimed at solving specific challenges.
Skin texture
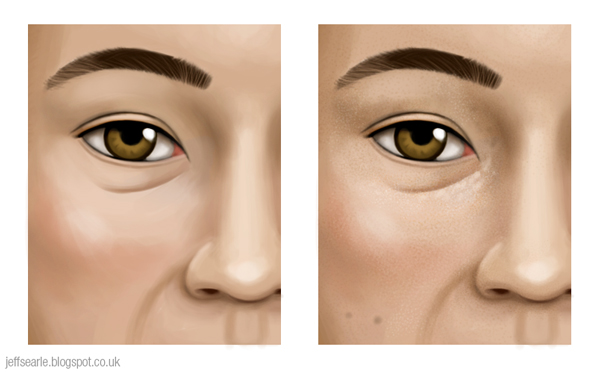
If you look at human skin closely, it is not smooth like porcelain but has a rough texture created by pores, moles and hair follicles. A bit of texture adds realism and helps you avoid the plastic look that overly ‘perfect’ digital skin can have. While most of your texture should come from using a painterly approach to painting the head, you can also add some separately as a final polish.
Digital artists sometimes use custom texture brushes for this. A simple method is to dab a few speckles of varying opacity onto a square, make it a bit blurry, then save it as a brush in Edit > Define Brush Preset. Apply some scattering, say 120%, and an angle jitter for variety.
Clever brushes can be seductive. Really all you need is a basic round brush, at small size, and use it to dab or scribble on a new layer so you can adjust the opacity etc to complement the skin. Keep it at a very low opacity.
In the before-and-after below I applied a custom texture brush to the right-hand image then scribbled on top for some extra effect.
Many digital artists seem to get obsessed with fine detail. Unless you’re a hyper-realist, I don’t recommend you get carried away with trying to reproduce every hair and every pore, as I don’t believe it contributes to the feeling of the painting. A broad sense of texture will do perfectly well, and many superb paintings past and present don’t trouble with it at all. The great oil painters didn’t see any point in painting individual pores and hairs and you don’t need to either. The whole point of painting someone is to communicate something emotional, about their and/or the artist’s state of mind. To spend hours on relatively insignificant details is to misdirect your energies in my opinion.
A last word
Please bear one thing in mind. Techniques like the ones above can sound exciting to beginners, like ‘secrets’ that will help them paint like professionals. Theory is important, but artists shouldn’t let it stop them creating images the way they want to. For example don’t feel you have to rush off and remake your last portrait because it doesn’t include ‘colour zones of the face’. Even with broadly accepted ideas like colour temperature, artists disagree on where to draw the line between warm and cool (greens and purples can be contentious) or simply respond to them in different ways. The rule is not to follow a formula but to paint what you see – more or less. And if you don't like what you see, well, paint whatever you want!


Hi Jeff,
ReplyDeleteSome months back, we contacted you to use one of your anatomy drawings in our yoga book with the promise that we would supply you with a free copy of it upon publication. We need your email address in order to send it to you. Contact me at helen@righttojoy.com.
Many thanks, Helen
I really appreciated this information and will definitely use it on my oil paintings.
ReplyDelete