
Structure
The overall form of the hair is determined by the skull. When you draw the hair it’s important to be aware of the three-dimensional head beneath, otherwise the hair may look flat or extend wrongly into space. The hair clings to the skull as an additional volume with its own dimensions:

When we think of hair as a block it will also have its own planes:

Hair grows in particular areas in particular ways, known as hair growth patterns. It flows in set directions. Hair at the front of the head tends to flow forwards. At the temples and side it flows backward and/or downward. On the back of a head there is a whorl of hair radiating outwards, usually clockwise.

Long hair at rest will grow downwards and wrap around the shoulders.
Recession
Men’s hair often recedes as they age, initially moving back in two cut-away shapes on either side of the forehead. It may continue to recede, meeting up with a bald patch on the back of the head, a process known as male pattern baldness. It is less common in Black men.

Women’s hairlines usually don’t recede, but their hair does get thinner with age.
Texture and colour
Hair texture is partly defined by how thick the individual hairs are: they can be fine, medium or thick (coarse). We can also talk about texture in descriptive ways such thin, lank, wavy, curly, woolly etc.
Reducing human variety to a handful of categories is useful only up to a point, but speaking broadly, there are three types of hair based upon ethnicity. African Caribbean hair is very dark, effectively black, and tightly curled. Asian hair is dark and very straight. Caucasian (white European) hair can be straight, wavy or curly and ranges from pale blond to dark. Red hair is more unusual and tends to go with wavy or frizzy hair.
Here are a few common hair colours:

As we age, pigment loss leads to hair turning white, though this affects Europeans more than African Caribbeans.
Widow’s peak
A widow’s peak is a V-shaped point in the middle of the hairline. It is an inherited trait that can appear in both men and women.

There are varying degrees of the peak. People with no widow’s peak have a hairline that runs straight across.
Drawing the hair
It’s tempting to be distracted by the mass of individual strands, but you should begin by capturing the general shape of the hair as a whole. Sketch in the volume of the hair, including its main forms and perhaps also the major plane changes.
Hair can be trim and neat, but it can also be random and messy. You don’t need to reproduce every last twist, curl and strand in front of you. While capturing the general feel of the mass of the hair, consider imposing a simplified sense of design and clarity where appropriate.
Locks
Strands of hair tend to group together into locks. As always, we can make complexity less intimidating by simplifying it, starting with the basic forms and gradually building up towards the details. Below is an example, though of course every lock won’t look like this. I drew these digitally but the general approach should suit any media:

1. Draw in the locks as simple shapes
They won’t look much like hair at first, but you’re trying to capture the basic forms. You may find sub-groups of locks within larger forms. Locks tend to taper, and for short hair it is effective to use a host of short, V-shaped locks.
2. Reduce the lock to a simple pattern of light, half-tone and shadow
Apply tone in the same way as to any other form. We discussed this briefly in a previous post. Think about the direction of your light source(s) and how the light affects the underlying form, i.e. the head. The surfaces facing the source will be light, those that turn away from it will be dark. Begin with broad areas of light and dark and then start to render more carefully.
3. Draw strands and break up the rigidity of the form
Avoid filling the highlights with too many details, as this can darken them and confuse the lighting; similarly, you won’t be able to see as much detail in the shadows. This means that most of your textural work will be in the half-tone areas.
Curls
Think of curly hair as a mass of curly locks, each one basically a cylinder with its own volume. The lock is like a ribbon that’s been wrapped around the cylinder to curl it, then left to hang free. Apply tone as you would to a cylinder.

Now put them together
When we put many locks together with the necessary variation, we can draw very convincing hair. Think of a mass of locks as a mass of ribbons. It helps the eye if the highlights and shadows have a flow or pattern to them. Don’t forget the forms underneath: individual locks will cast shadows upon locks below them. We should also employ elegant variation to keep the hair from looking mechanical, so don’t make all the highlights and shadows the same size and intensity.
An artist should be prepared to alter what he or she sees in the interest of good design. If your subject’s hair is bit confusing, consider changing the arrangement of locks and the pattern of light and shadow to clarify what is going on.
Tips on drawing hair
If you’re drawing the hair in any detail, you need to be cautious drawing the hairline, as it isn’t really a line, but a transition from sparse hair to copious hair. If you make the hairline too hard-edged, the person’s hair can resemble a plastic cap, like Lego. The same goes for facial hair: a sudden, thick and dark edge can make your subject look like he’s wearing a fake beard from a joke shop.
The same goes for hair’s outside edge, which should not have too hard an outline. Some hairstyles are extremely fluffy or frizzy, with loose strands curling all over the place. Even with tightly controlled or gelled hair, there will be loose strands and contour variations that break up the outline.
There are many thousands of hair strands so don’t even think of trying to draw every one! Instead, create the impression of thousands of strands.
When you’re drawing locks of hair, especially long ones, draw with firm, confident strokes, getting lighter at the tip. You will get nice, sweeping lines if you draw with your arm, i.e. from the shoulder not from the wrist.
It is a good rule of thumb, whatever you’re drawing, to make your linework softer and thinner in highlighted areas and heavier in the shadow areas, to make the line more expressive in communicating light and form.
When creating texture, it can be effective to use a combination of hard and soft media. That could mean soft and hard pencils, or in Photoshop a mix of large, soft bushes with small, hard-edged brushes. Use the softer medium to block in the basic tones and capture the sense of stray strands and fluffiness, then harder media to draw particular strands and details on top.
Facial hair
It’s mostly men who have noticeable facial hair. Women’s faces are covered in hair too, only it’s much lighter and downier than men’s, so we tend not to notice it. Beards and moustaches on women are very rare but some women have a discernible fuzz especially around the upper lip, so observe carefully.
Facial hair tends to flow from the centre line of the face radially outwards. Draw facial hair flowing in the direction the hair grows, with strokes matching the length of beard growth.

Beneath the lower lip, beard growth is thin on either side roughly where the pillars of the mouth are, whereas the centre is much fuller.
A very short beard conforms closely to the structure of the face, though its bristles may break up the facial outline. For a full beard, think of it as a volume with its own dimensions and its own front, side and bottom planes.
For stubble, if you’re working in Photoshop an easy solution is to use a custom brush. Paint a few random dots on a small canvas and then go to Edit > Define Brush Preset to save the pattern as a new brush in your brush library. Then you can easily block in the stubble. You can edit settings like Scattering, Size, and Opacity to get it how you want.

Painting hair step by step
Here is a step-by-step tutorial on how to paint a realistic head of hair. It is written from the perspective of someone working digitally in Photoshop, but the process should be useful to artists working in other media.
A highly-worked hair painting can look awe-inspiring and intimidating to a beginner. Hopefully this tutorial will demystify the process and show that it’s really only a matter of technique and application.
Create a custom hair brush
Before we start, let’s create a custom brush which will make hair much easier for you to paint. You can still get good results without one, but for a beginner it should help you to achieve a convincing effect.
Creating a Photoshop brush is easy. Make a new canvas about 400 x 400 pixels, then paint some black dots of varying size. Keep away from the edges. If you make all the spots identical you will end up with a really boring brush, so vary the sizes, shapes and opacity. This will make the brush both more interesting and more realistic, as the effect will more closely resemble real hair. It might look a bit like the example below. But make your own, don’t just download mine.
Go to Edit > Define Brush Preset and give it a name. Now, if you go to the Brushes palette (press F5) you can see it there. The next thing is to make some tweaks. In the Brush Tip Shape menu, tick Smoothing and Transfer and set the Spacing to 1–5%. This turns your dots into smooth lines, allowing you to paint hair-like strands. You can use the Rotate function to find the angle that works best.

When you’re satisfied, save your brush by clicking the ‘Create New Brush’ symbol at the bottom of the palette.
Some digital artists go crazy with custom brushes, which is fine I suppose, but serious artists shouldn’t rely on a brush to do the work for them. The standard hard and soft brushes, along with this new hair brush, are all we need to paint hair.
1. Canvas
Create a new canvas and fill it with a neutral colour as a base. We will paint the flesh tones on extra layers on top.

2. Sketch the basic volumes and flow
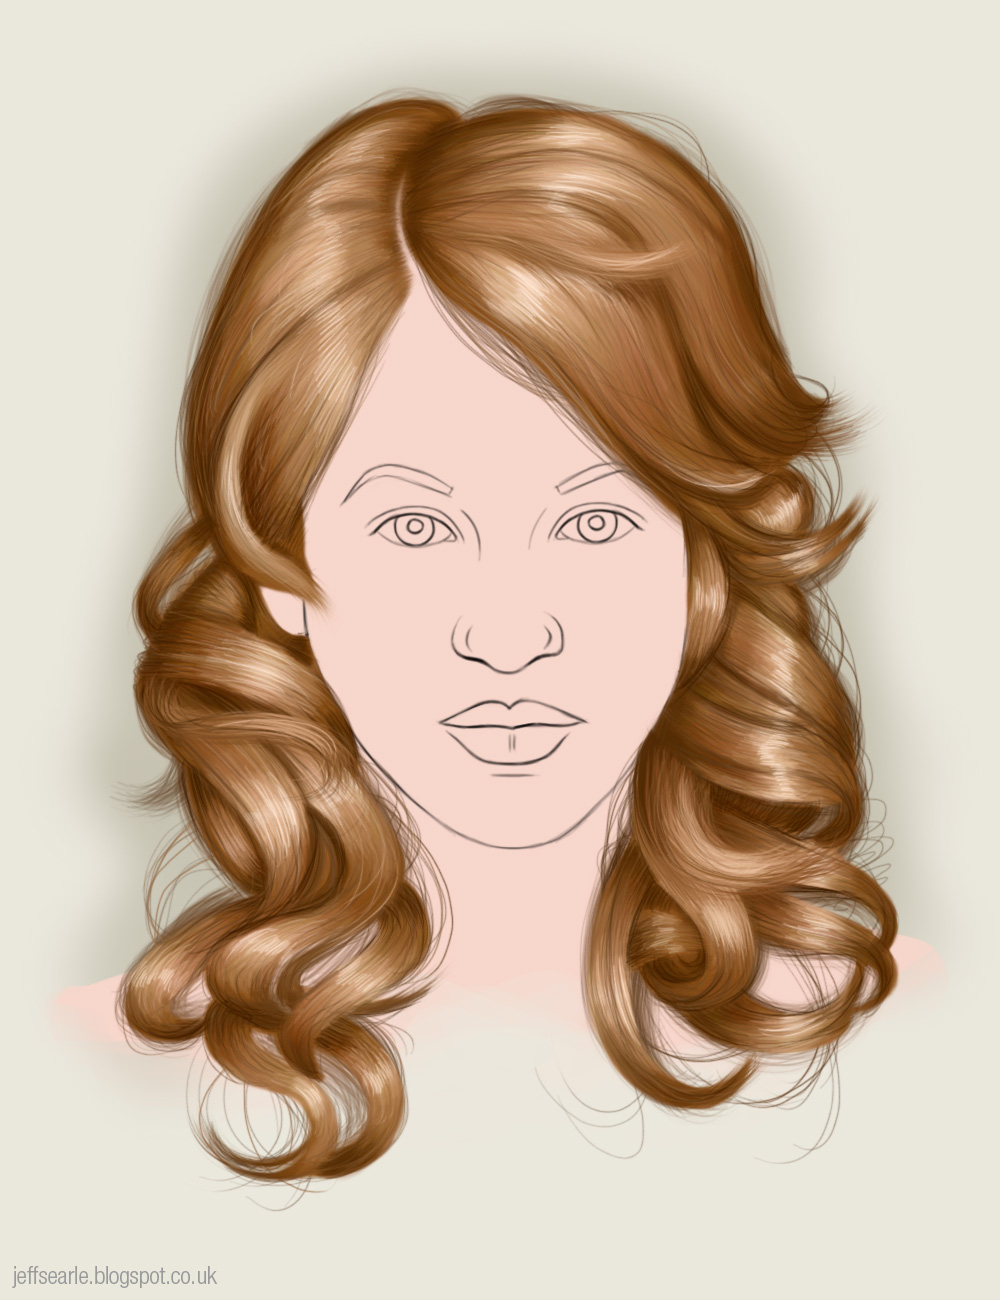
Create a separate layer and use a small, hard brush to sketch in the face. I won’t be painting the face in this tutorial, but will sketch it in for context. Draw the broad outline of the hair, remembering to give it its own volume. You may want to indicate some major plane changes, though I've not felt the need here with the straight-on view.
Then observe and draw the main locks of hair, simplifying where you think necessary.

3. Colour blocking
Choose a base colour for the hair and paint in the basic shapes. Note in our example how the hair is flowing around her head. Try to get the major forms correct early on – later in the process it gets harder to fix mistakes.
Beginners should bear in mind that details are harder to see on black hair, making it less suitable for practicing.

You can use a soft brush for this stage, leaving a smudgy outline to suggest the soft wispiness of hair. We’ll add more precision later. You may think it sensible to have different sections of the hair on separate layers – it depends on the hairstyle.
4. Define the lights and shadows
With the base ready, we now define the forms using light and shadow. Create a new layer (you can merge this into the other hair layer later if you want). For this stage, use your custom hair brush.
Pick a darker colour and paint in the shadow areas, then pick a lighter colour and paint the highlights. Paint broad strands, following the way the hair flows around the head.

5. Intensify the lights and darks
Add an extra layer of more intense lights and darks. I’ve ditched the sketch layer at this point, except for leaving the face in for context.

6. Use more colours
The hair is taking shape. We should give the hair some additional colours to make it livelier and more realistic. With a low opacity brush, scribble in some additional streaks – I’ve added a few touches of yellow and red. Best to do this on a new layer, and use an eraser to amend the effect. Once you’re satisfied you can flatten it down. I have kept mine subtle.

Consider adding subtle traces of the background colour to the hair, and painting some of the background colour over the edges of the hair to blend the two elements together. This helps connect the hair to the background, and suggests the reflection of colour from the sitter’s environment.
7. Paint smaller strands
It’s time to define the hair more precisely. With a very small brush and using quick, confident strokes on a new layer, add lots of thin strands using the colours we’ve established.
You want to create the impression of a mass of strands without having to paint every single one. Some digital artists, especially, seem to get obsessed with painting every detail. There’s really no need, and unless you’re aesthetically committed to hyper-realism it detracts from the work in my opinion. Even my own painting here goes way beyond the level of detail considered necessary by great portraitists like Sargent for example. Part of being a good artist is knowing what to emphasise. You want the viewer to admire the emotional impact of the portrait, not be distracted by pointlessly spectacular skills.
Concentrate the detail in the medium-lit areas, while allowing highlights to stay bright and letting shadows stay dark. Keep the strands in highlight areas very thin. Go back with an eraser to make adjustments.
Use the strands to break up the locks you’ve blocked in. With a low opacity brush, add strands below the main hair layer, to build up a convincingly wispy, fluffy edge.

Every hairstyle has its own level of tidiness, or lack of it, but don’t be too neat with these strands. Hairs go all over the place, so let them shoot off in their own directions.
8. Final details
The painting is coming on nicely now. Use tools like Levels and Hue/Saturation to adjust the colours and intensities. Zoom in to the image and use a small brush to add more individual hairs, working your way around the whole head.
Break up any chunks of colour or hard edges that catch the eye in the wrong way, and add some variation in direction and movement on any locks that seem too uniform. You may want to add some new, small locks on top for realistic variation.
Use a dark colour to add an extra level of shadow in key areas, such as where locks of hair overlap others. Then use a light colour to touch up the highlights.
Artists remove as well as add. Use an eraser to remove some of the body of the locks of hair, i.e. using space to divide strands and heighten the realism.
On a portrait you should darken the skin areas cast into shadow under the hair. This will look more natural, and less like the hair is simply pasted onto the head. As I’m only painting the hair itself I’ve skipped that step.
My final hair study. Click to enlarge.
What to do
A good exercise is to sketch a head and practice drawing different hairstyles on it. You don’t have to spend very long on each one, just get used to reproducing the flow and forms. Here are a couple of sets I did:


Obviously, gendered hairstyles are merely conventional. There’s nothing to stop males having ‘feminine’ styles and vice versa. The only limit on a person’s hairstyle is what their hair will physically allow them to do with it – sub-Saharan Africans can’t naturally have straight hair, and hardly any women are able to grow a beard – but even then there is the possibility of artificial hair such as wigs or extensions.
This is only a handful of examples. I could do hundreds more. The variety of possible hairstyles over eras and cultures, especially when you include coloured dyes, accessories such as hair clips, and so on, is effectively infinite.
The other thing you can do is obvious enough. Get some source material, and draw lots of heads of hair.
No comments:
Post a Comment
I welcome contributions to this blog. Comments are moderated.