
 |
| Loomis’s books have been reissued by Titan Books |
One of the traditional approaches to drawing the head is to begin by conceiving it as an egg, as we did in a previous article. But this has its limitations. Only the front view of the head looks like an egg, and even then an egg doesn’t confer a proper jawbone. The analogy works less well again in profile. So the egg, though a handy starting point and worth knowing as a technique, is not ideal.
Instead we may begin with a form that better represents the skull. The skull is like a ball or sphere that is flattened at the sides and a bit fuller in the back. The bones of the face, including the eye sockets, cheekbones and jaws, are fastened to the front of this ball. Reducing the head into its basic forms, we can use a sphere as the cranium then add a plane on front for the face. As this frontal plane has sides, we may best conceive of it as a block, giving us a proper jawline.

Loomis’s method constructs the ball and plane as a unit which we can tilt or turn in any way. Because the model is simpler than an actual human head, it is easier for the artist to manipulate while sketching. Once we understand the process, we can stretch, narrow, flatten or otherwise modify elements as we please, without departing from the basic model. It is flexible enough to help us portray any subjects or characters we want, at any angle.
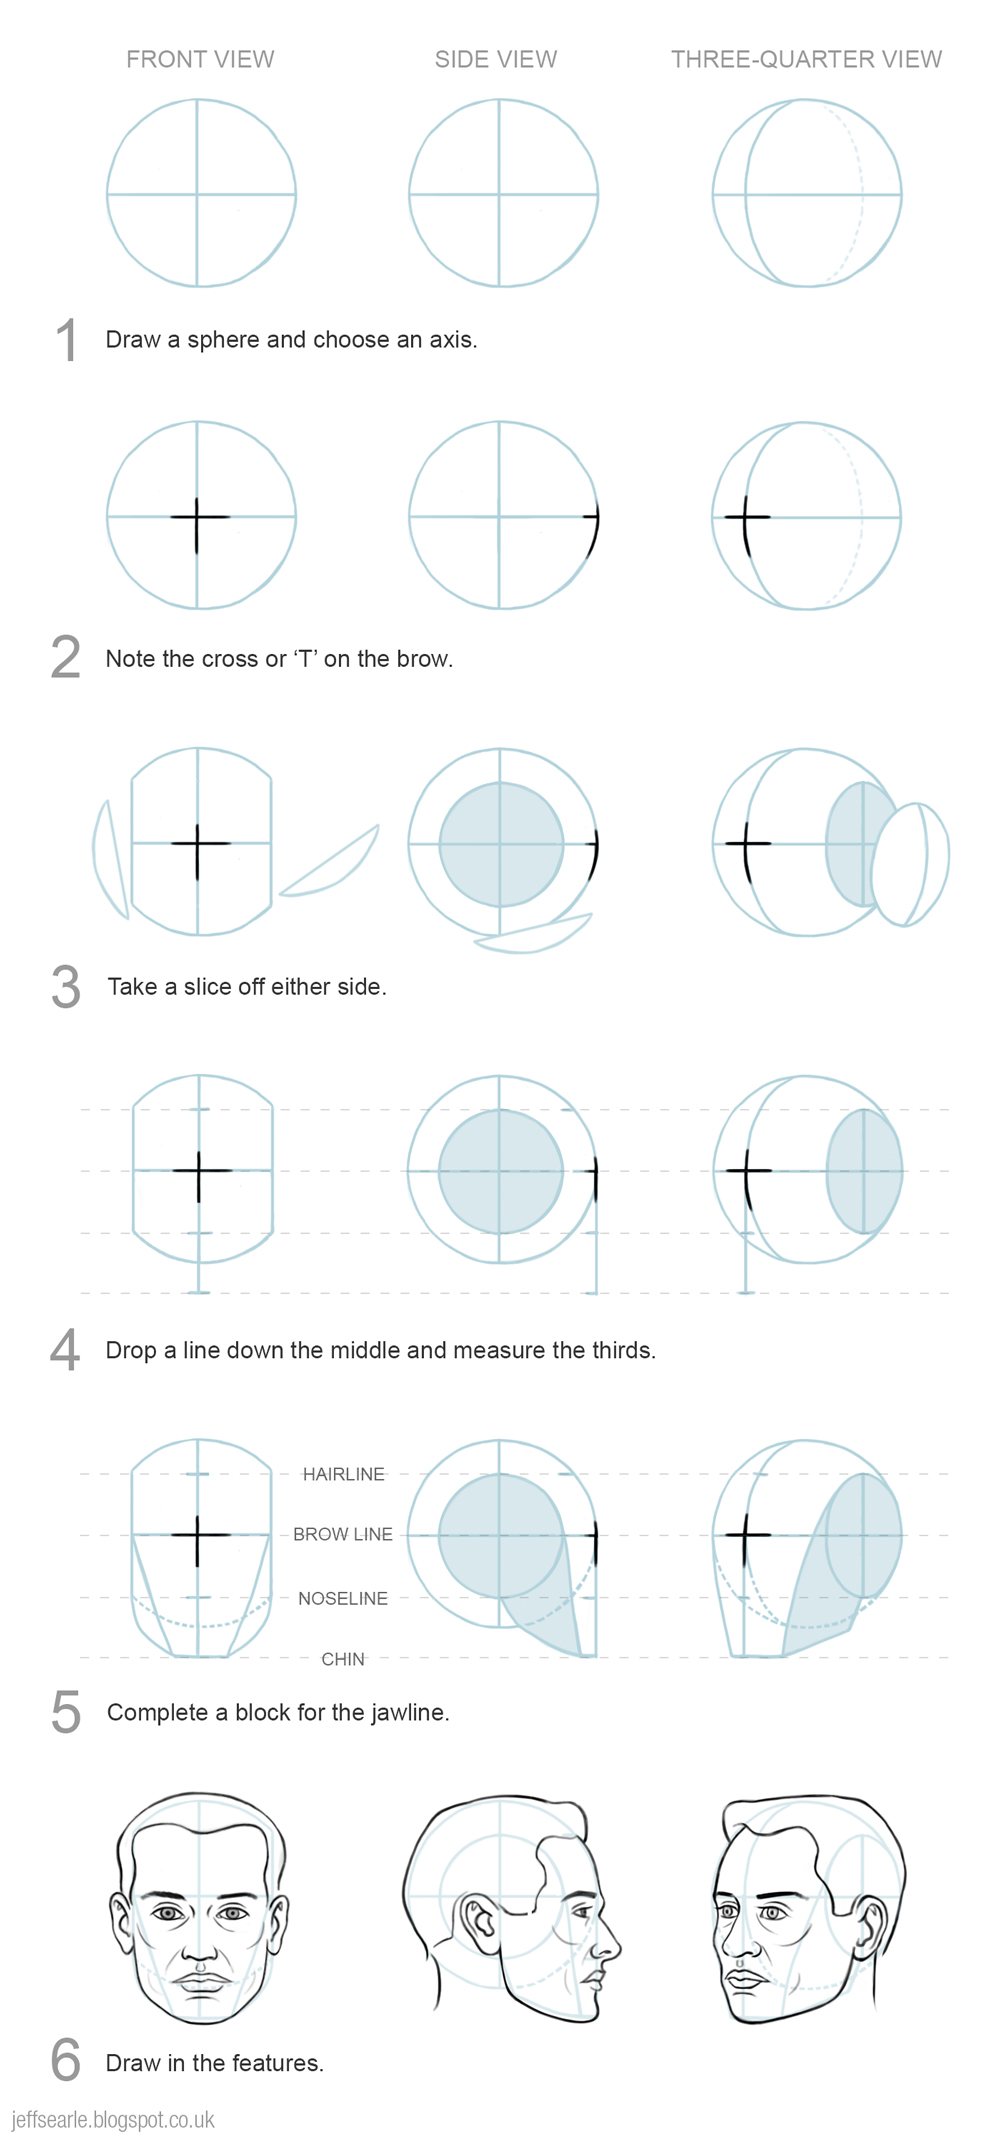
1. Draw a sphere for the cranium
We start by drawing a ball. We must think of it as a solid in three dimensions, so divide it with vertical and horizontal lines that follow the contours of the form. The ‘equator’ of the ball will become the browline; the vertical axis gives us the middle line, or centre line, of the face. We will illustrate the process with a three-quarter view, but will look at front and side views later.

These lines establish the direction the ball is facing by setting it upon an axis. The axis determines the angle of the head and therefore what we can see of the facial features. In the examples we have ‘drawn through’ as if the ball were transparent, to reveal the construction of the whole. This will help you think about the features that are out of sight.

The ‘all-important cross on the ball’
Where the brow line and the middle line meet, they form a cross. This indicates the alignment of the facial plane on the ball and is the key point of construction of the whole head. (Michael Hampton, in his book on figure drawing, prefers to think of it as a ‘T’.) All relationships spring from here, so locating it is important. Whether you actually draw a cross on your sketch or not is up to you – what matters is that you are aware of it as a focus point.

Slice off the sides
People’s heads aren’t spherical. To make our model a bit more realistic, we need to take a slice off either side of the ball to flatten its width, a slice about two-thirds the height of the ball. In profile, this side plane (shaded in the illustration) will look like a circle, but at an angle, it will look like an oval.

Divide the side plane into quarters with horizontal and vertical lines. As we’ll see in the next step, these will be useful for locating the features: the vertical line roughly marks the placement of the ear and the back limit of the jaw, and the horizontal one continues the browline around the head to mark the top of the ear. The oval’s top edge aligns with the hairline and its bottom edge aligns with the bottom of the nose. The top left edge of the oval roughly marks the corner of the forehead, i.e. the front edge of the temple.
2. Add a block for the face and jaw
That’s the ball. Now add the plane, or block.
Measure thirds
Firstly, drop the middle line down from the front of the ball – starting from the browline, NOT the top of the head – and divide it roughly into thirds. The first third is the distance between the hairline and the browline, then make the next two thirds the same length. The second third takes you to the bottom of the nose (noseline), the final third to the chin. The head is a three-dimensional form, like a box, so the thirds apply all around the head.

Add the block
The jawline joins up with the centre of the oval or side plane on both sides of the head, and meets up with the chin in front, creating a form corresponding to the jawbone. Loomis advises that the back line of the jaw should fall just short of the earline. It can be tempting to make the jaw too long, so measure your thirds to get the relationships right.
In the illustrations I also drop an extra line down the front of the face, from the oval to the chin. Loomis doesn’t do this, but it’s a useful way to indicate the front plane of the head.

That’s it! We end up with a strong three-dimensional form with a front plane and side planes.
There is also a bottom plane under the jaw, which will be visible from some angles: in the previous article I pointed out this important plane, which can make such a difference to drawing heads correctly. The skull will protrude a bit from the back of the sphere too. Loomis adds an indent at the eyeline, and you can too if you want, as it indicates the real indent at the eye sockets.
Once you have set up the ball and plane, or sphere and block, you can manipulate it however you want.
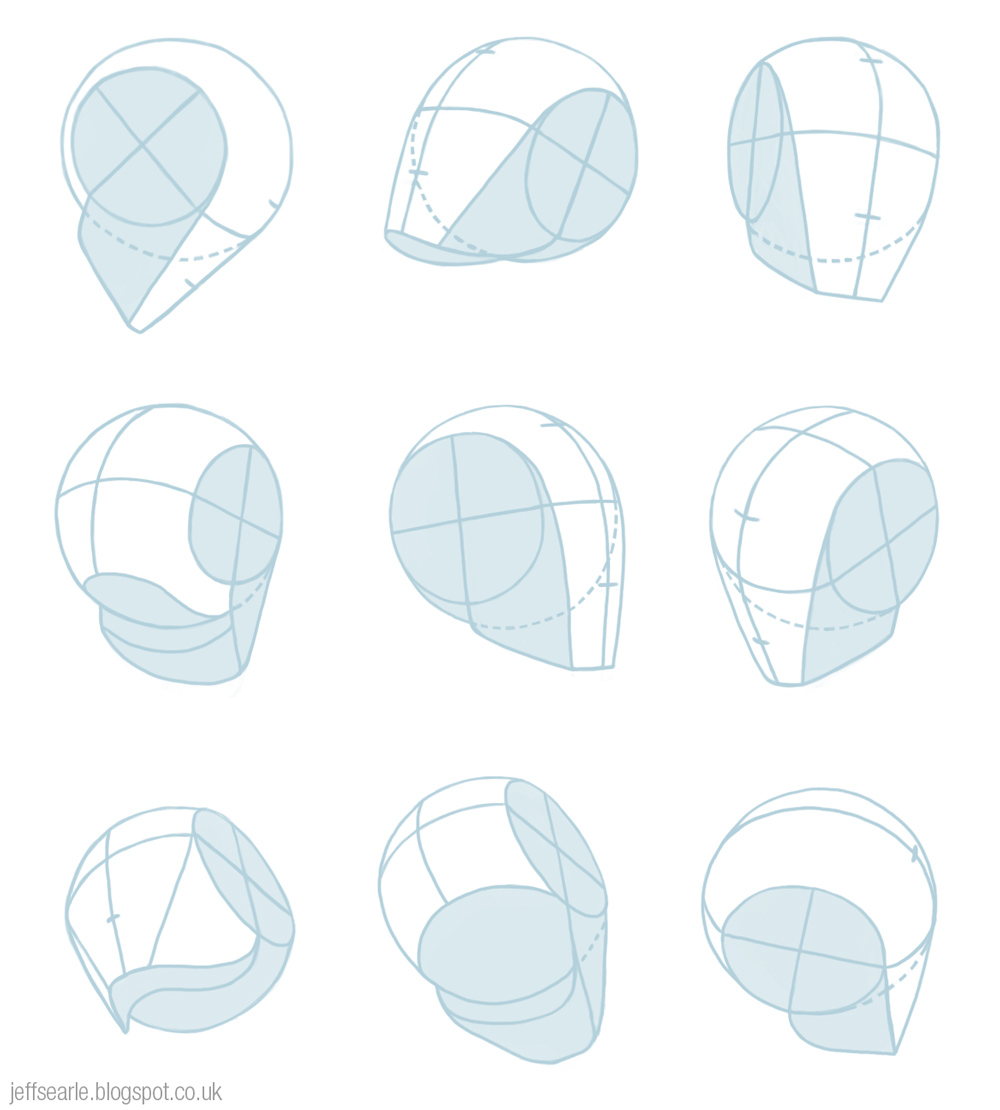
Of course, you can deviate from the model as you please, since real people are very diverse. We will look at drawing different sexes, ‘types’ and so on another time. Please remember that these are rules of thumb for sketching. They’re not architectural plans! Don’t get hung up over exact measurements or placements. In a real drawing, guidelines often get obliterated anyway.
3. Add the features
With the basic structure established, you should not have too much trouble adding the features in the right places. Most people’s features are symmetrical and will balance on the middle line of the face. Whatever the viewpoint, match them to the construction lines to help you get them correct.
To avoid confusion, be aware of a difference between this method and the ‘egg’ method we looked at in an earlier post. In the ‘egg’ method, the line through the centre of the egg is the eyeline. In the ‘ball and plane’ method, the line through the centre of the ball is the browline.
- We have already located the hairline, the brow, the bottom of the nose, and the chin.
- The eyes sit just below the browline.
- The nose sits between the browline and the noseline. It follows the middle line of the face, starting from the bridge then extending out from the front plane.
- The ears attach along the earline, which is the vertical line on the oval. Follow the browline around the head to find where the tops of the ears should be, and the noseline to find where they end. In other words both ears and nose roughly match up with the middle third of the ball-and-block unit. The ear sits in the bottom right division of the oval.

If you research in art books and the internet you will see people practicing the ball and plane method in slightly different ways. That’s fine. What matters is that the method works. Loomis explains why:
Though we do not see the bones in details, we must think of them as the framework of the head. All the division points of the head are related to the bones, not to the flesh. The reason we chose the ball and plane as an approach now becomes apparent, for our approach is the skull itself, simplified and made understandable.
(Drawing the Head and Hands)
Of course, you will have to draw a lot of heads before they come naturally. But drawing anything well is simply a question of practice. If you have the basics right, everything will be easier, and your heads will have a convincing realism and volume.
Here is the method in summary, including front and side views:
When you are adept at the construction of the ball and plane, you have taken a big step towards drawing heads well. Many artists have struggled for days over a drawing or painting that just wasn't right, because of a mistake in a basic aspect of construction. This method will help you to spot difficulties and correct mistakes.
What to do
Practice creating the ball and plane and draw it at a variety of angles. Once you have the hang of it, you will be using this method of construction for the rest of your artistic life. The more heads you draw, the more you will internalise the method and relationships. Your head drawings may not look great at first, and it would be misleading to suggest that the method will make all your faces magically fall into place with no problems, but the method will help you a great deal and make it easier to work out where you are going wrong. We will look at drawing individual features another time.
Again, don’t be too fussy about getting all the lines and placements ‘correct’: every head is different, and this method is merely a guide, not a strict science. My illustrations are diagrammatic but in practice you will be much looser, sketching them by hand.
Here are some heads I did as examples.

Thank you for the detailed explanation. It helped me a lot.
ReplyDeleteThank you! I have the Loomis heads and hands book and I could see it worked but could not understand how some of the lines came into it especially when it came to rotation You have now made this very clear and even roughly sketching your examples (especially the summary block) I suddenly can get a recognizable head. I will now go back to the book and taking more care in drawing the circles rather than the rough things I have just done from this page I am sure that I can make great progress with this book now I finally understand the principles. You have made my day sir!
ReplyDeleteGlad it helps!
DeleteThis was excellent, thank you!
ReplyDelete